

1. To get started, purchase and install the SLR Booth app from the Google Play Store on your Android device.
2. Plug your usb cable into your camera and Android device. Finally, turn the camera on – the app will launch and you’ll be ready to start taking pictures right away! You can also launch SLR Booth by clicking on the app icon.
Getting Started: The Main Screen
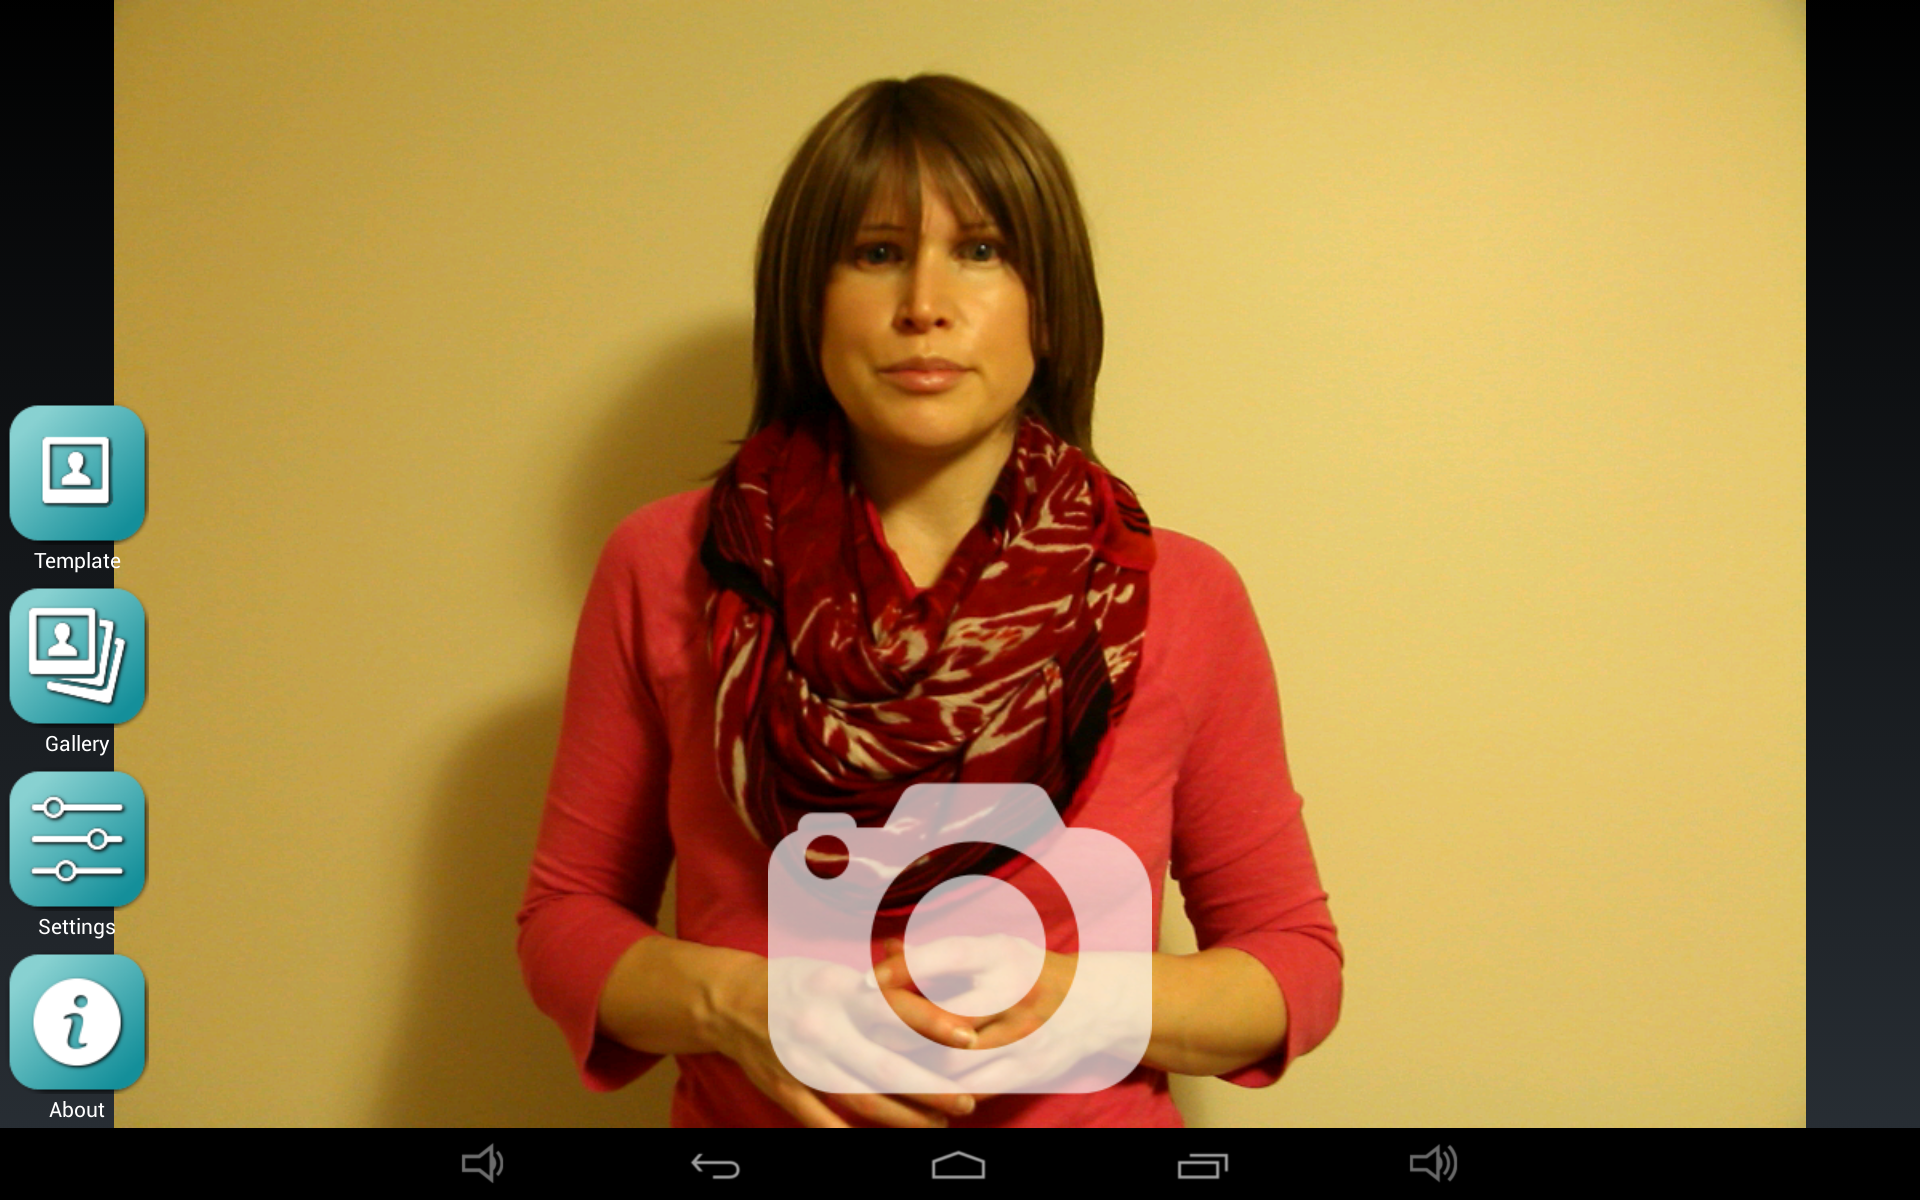
When you first launch the app and connect your camera, you’ll be presented with the main screen, and the app will search for your connected DSLR camera. When it finds the camera, it will start a live preview on the screen. Once the preview is running, you can take a photo one of the three following ways:
- Touching the camera icon in the centre of the screen
- Pressing the space bar key on an attached keyboard (or USB pedal configured as a space bar)
- Pressing the “volume up” button on your device (or using a Bluetooth remote shutter, which sends the “volume up” signal)
Once engaged, the app will begin a countdown to take the photos required for your current layout. If the countdown was launched with a touch, after each photo the subject will have the opportunity to accept or delete it. Once all the photos for your layout have been taken, you’ll have the ability to print, email, and upload to Instagram or Twitter.
Pressing the camera icon at the bottom of the screen will initiate a capture and begin the countdown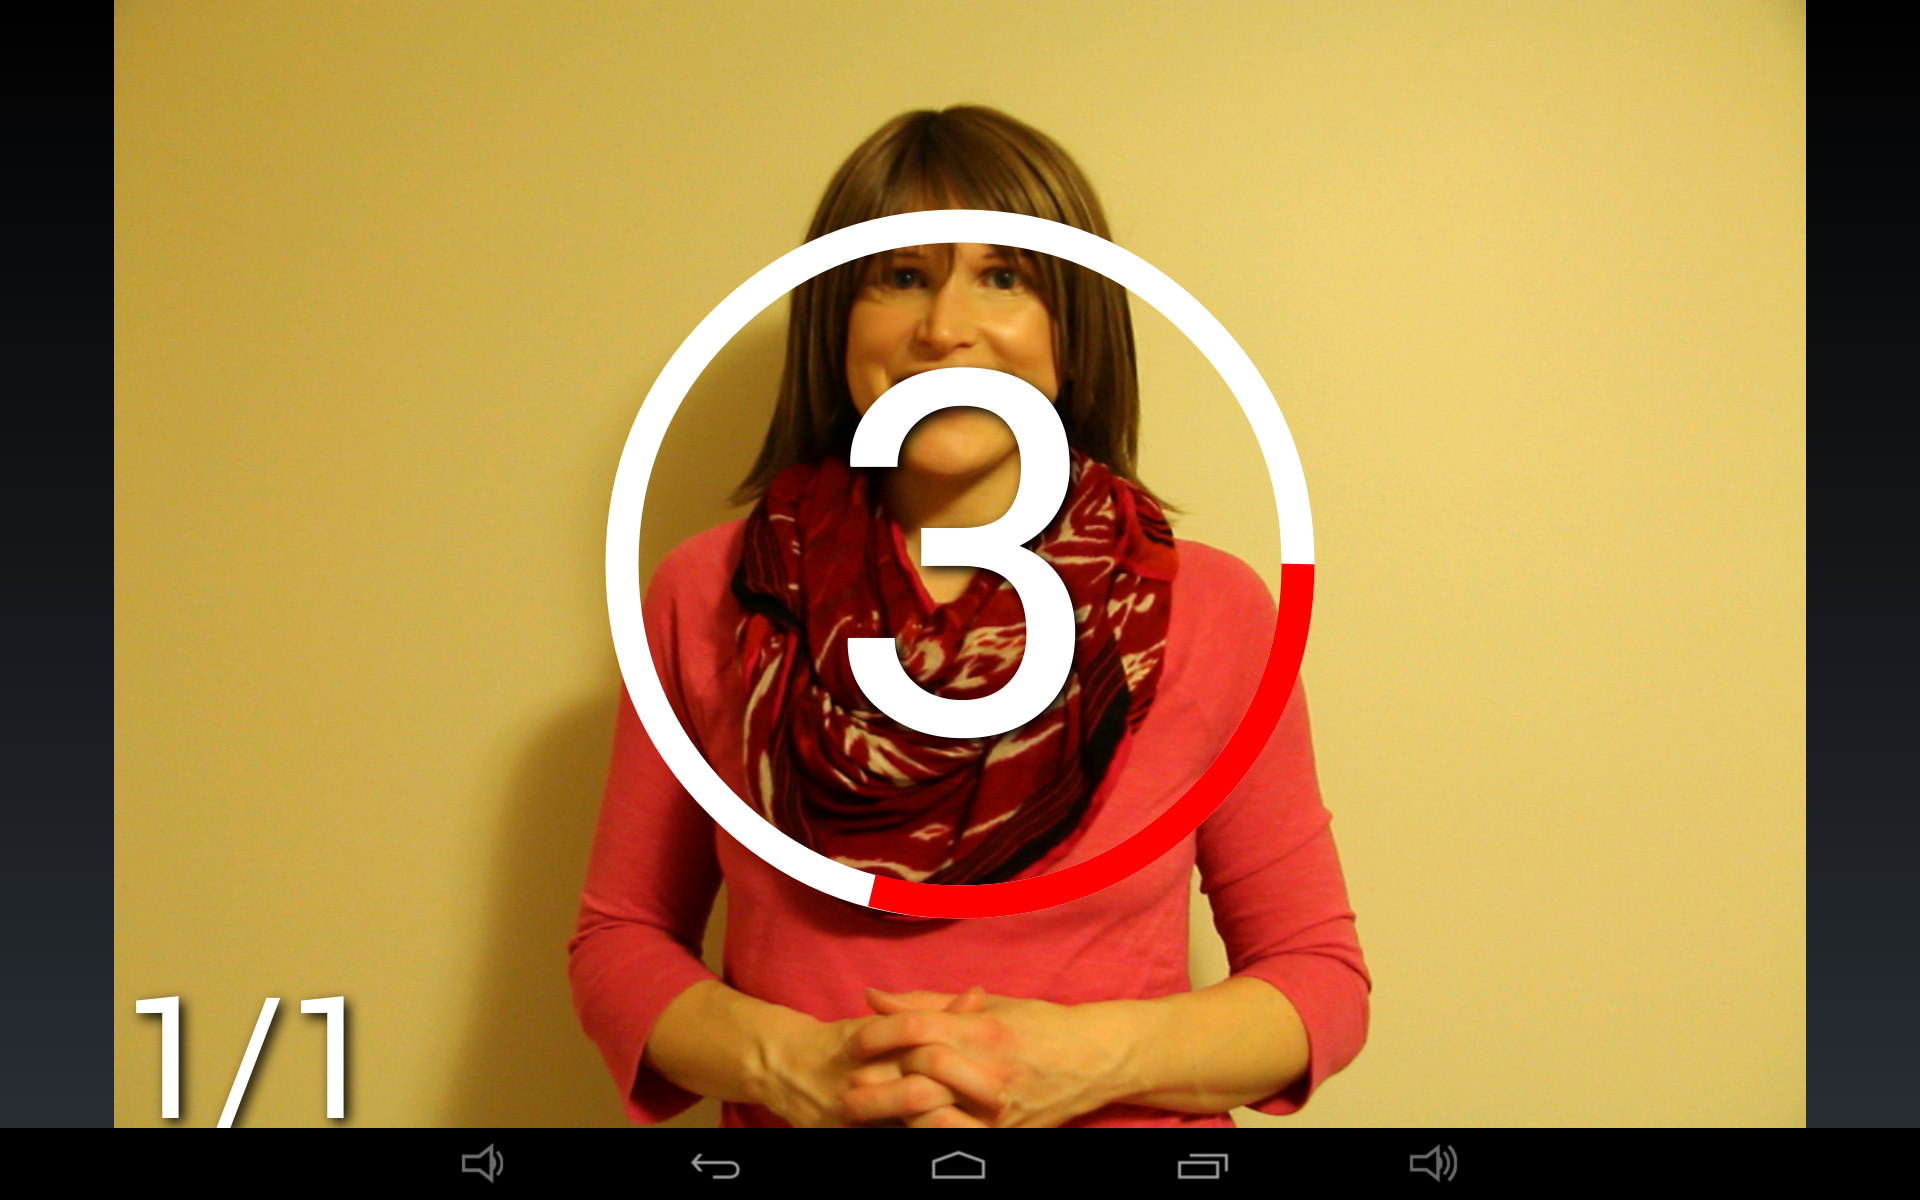
Once the photo has been taken, it will be downloaded and displayed on screen for review. You can choose to either keep or delete each photo.
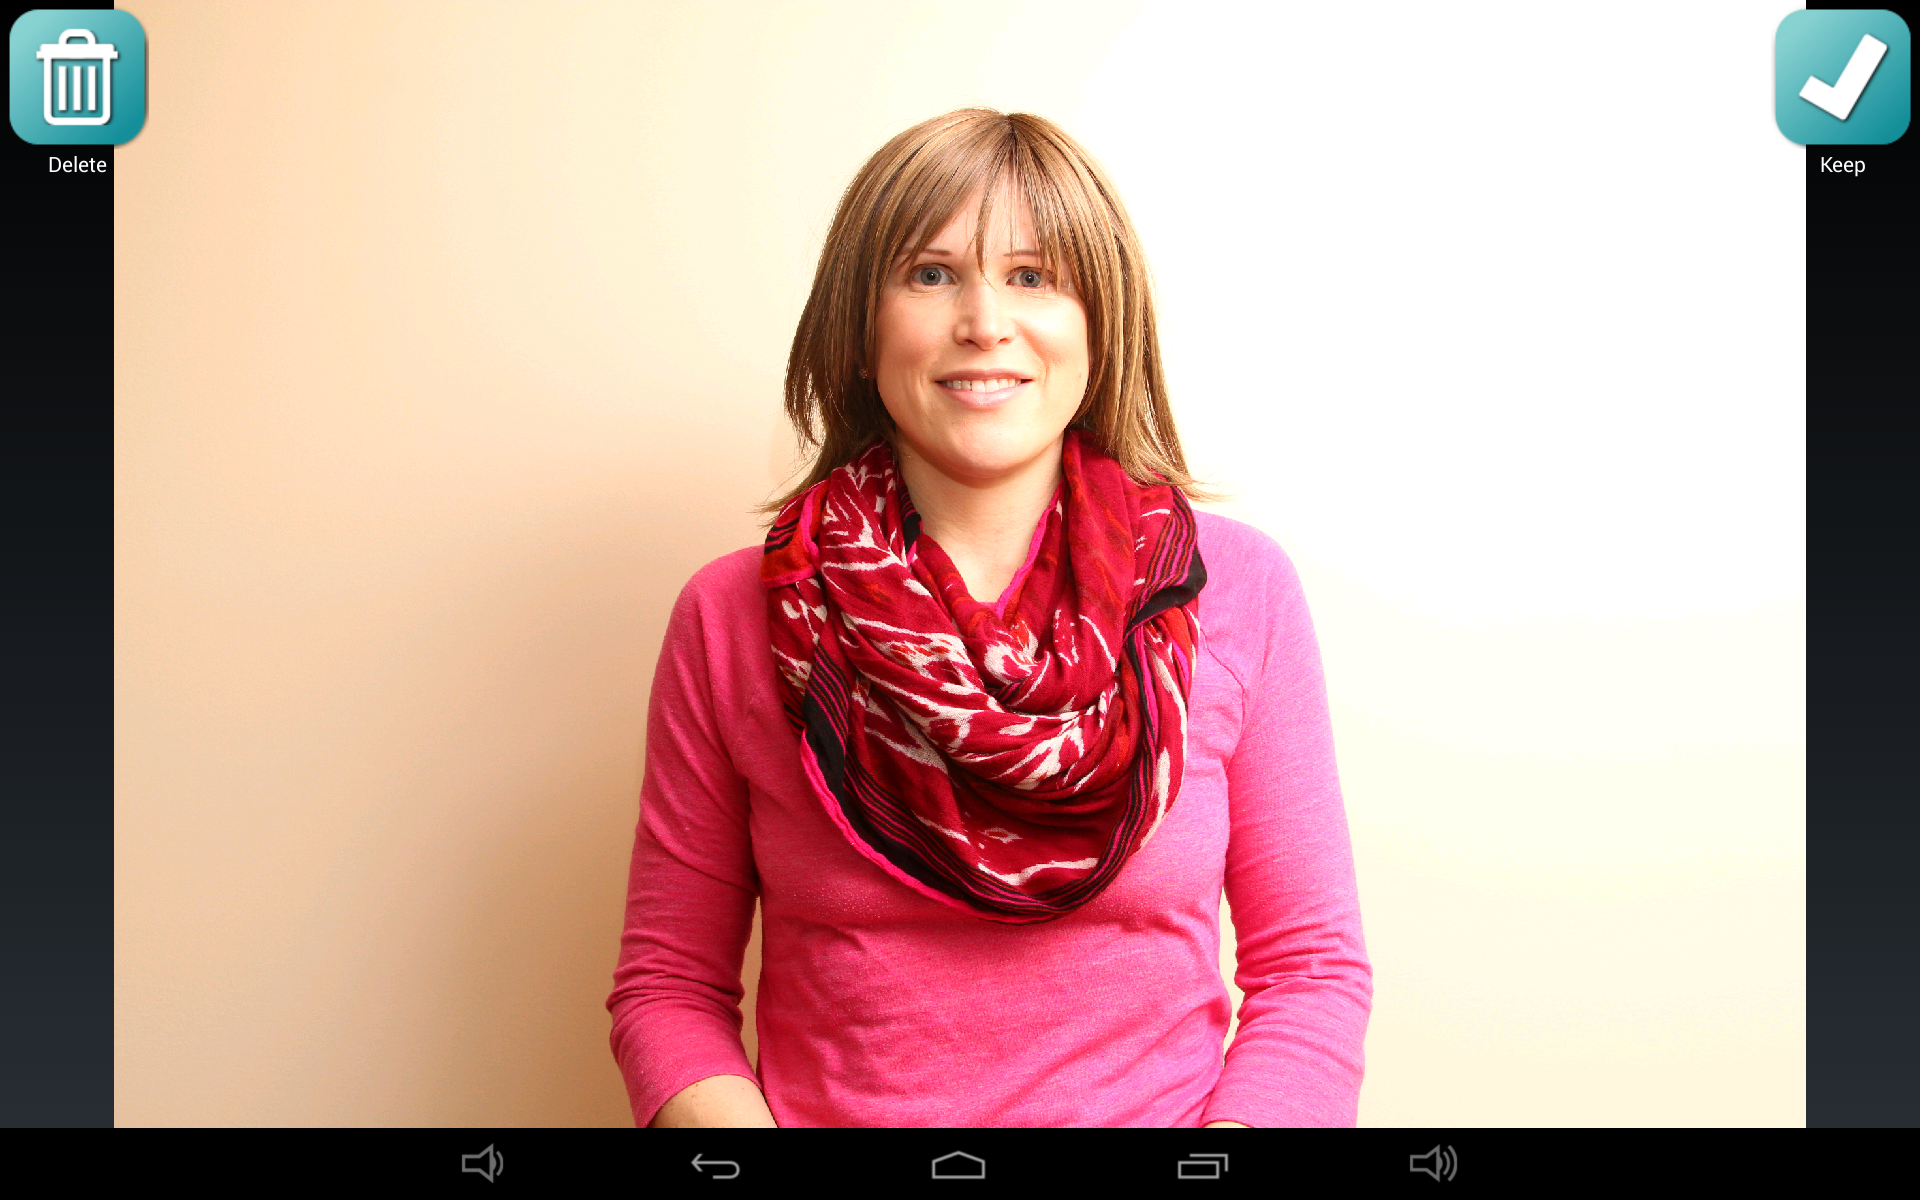
If you keep the photo, you’ll have the option to print, email or share the photo via Twitter and Instagram. You can set up custom hashtags for each event which will post along with the photo, making it easy for guests and customers to view event photos on their own devices in real time. 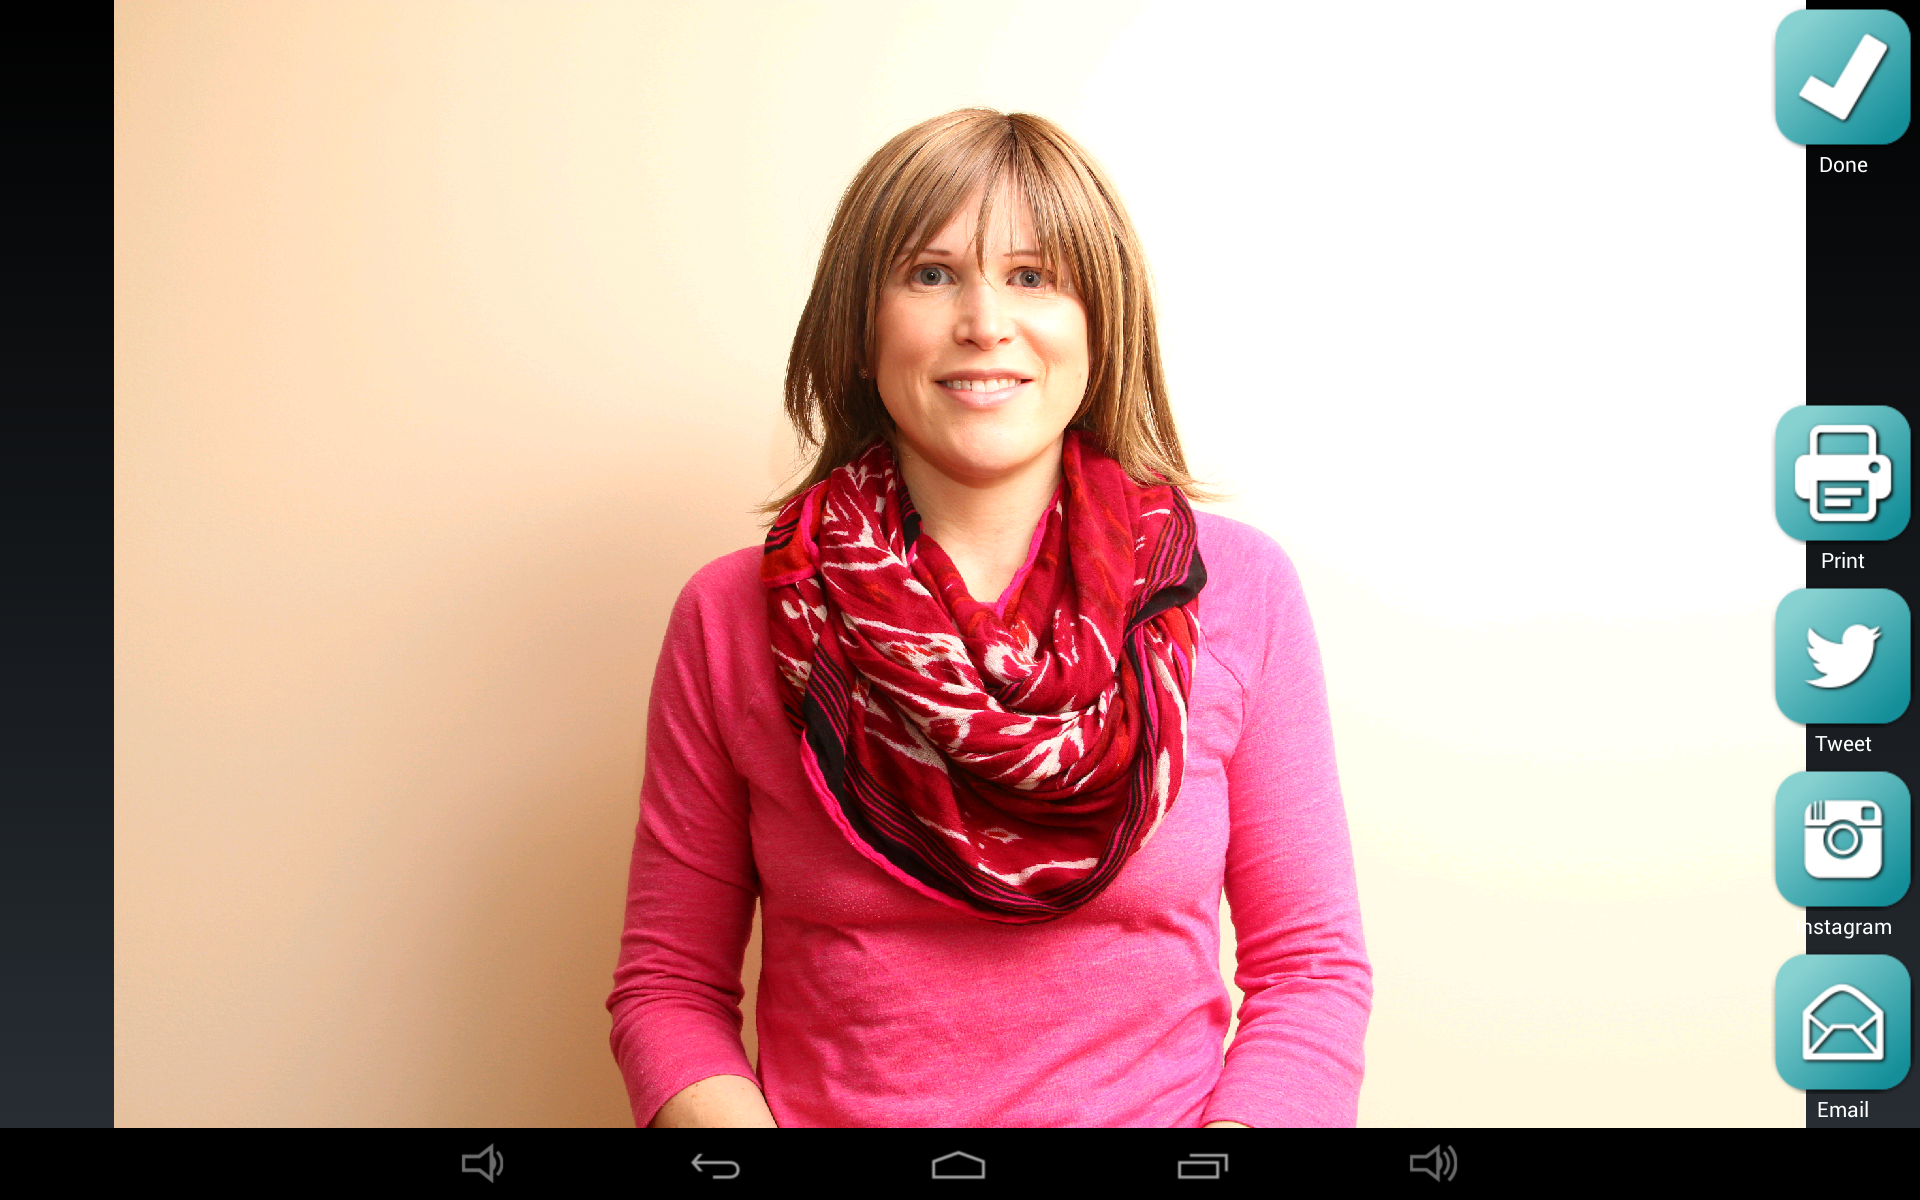
The first time you press the Twitter button, you’ll be asked to log in. Once you sign in and give SLR Booth access to post on your behalf, you won’t need to sign in again. If you need to logout and sign in as someone else, hold down the twitter button for two seconds.
Settings
The settings screen contains all the preferences that control your photo booth experience. It is broken up into three sections:
Photo Shoot Settings
These settings control how your photo booth behaves when taking pictures:
- Layout Footer Image: Lets you select a custom footer image to be used when using a template with a logo placeholder
- Album Name: Organizes your photos into a named album, allowing you to keep photos from different events separate
- Countdown Delay: How many seconds will the countdown timer run for before triggering the camera
- Shutter Delay: Delay (in milliseconds) between pressing the shutter, and the camera taking a picture. This needs to be set by trial and error so that the camera actually triggers right when the countdown expires. On a Canon 60D in “quick” live view auto focus mode, this is about 1200ms. Switching the camera to manual focus reduces the delay to about 50ms.
- Print Automatically: Controls if photos are printed automatically. This is intended for use with a foot-pedal or remote control triggering mechanism – if guests are using the touchscreen display, they can choose to print the photo or not.
- Printer: Searches for nearby photo printers, and allows you to select one to print to.
Social Media Settings
These settings control the interaction between the photo booth and Twitter
- Upload to Twitter: Controls if photos are automatically posted to Twitter
- Twitter Hashtag: Adds a #hashtag to photo posts, allowing easy searching
Email Settings
These settings control the account used to send email
- Email Server Name: Name of the email server. ie, smtp.gmail.com
- Email Server Port: Port the mail server is listening on. 587 for gmail
- Email Username: Account name. ie, myname@gmail.com
- Email Password: Password for the above username
- Use SSL: Enable for email providers that require SSL
- Use TLS: Enable for email providers that require TLS (Turn on for gmail)
- From email address: Email address the email will be sent from. Usually the same as the Email Username setting.
- Subject Line: Subject Line of the email which will be sent
Gallery
On the gallery screen, you can view the photos that have been taken with SLR Booth. The gallery will only display images in the current album. Initially, you’ll be shown thumbnails of all the photos in your album. You can scroll quickly through these thumbnails by dragging up or down. If you choose a photo by touching it, you’ll switch to the fullscreen view where you can delete, print, email, tweet or instagram a photo. You can also scroll between images in this view by swiping left or right.
About
The about screen displays information about the developer and libraries used in the application.
SLR Booth
Copyright (C) 2014 Greg Perkins
This product uses the following libraries licensed under the Apache License, Version 2.0.
JmDNS – Copyright (C) Rick Blair
ACRA – Copyright (C) Kevin Gaudin
Android Platform Base – Copyright (C) The Android Open Source Project
RWC – Copyright (C) Nils Assbeck, Guersel Ayaz and Michael Zoech
Twitter4j – Copyright (C) Yusuke Yamamoto
Facebook4j – Copyright (C) Ryuji Yamashita
Harmony – Copyright (C) The Apache Software Foundation
Details of the Apache License, Version 2.0 can be found at http://www.apache.org/licenses/
Great app. I downloaded it and love the features. I have it set it up with samsung galaxy note 10.1 and canon t6i. After the pictures are taken, i am trying to email them using my gmail account but i keep getting “authorizationfailedexception” error. I used the email setting according to the website. Please help.
Double check your username and password. Username should include the @gmail.com part.
Great…and hope there is a video on making tamplate of strip with 3 picture and wording…tq greg
I’ve got a few videos planned, advanced templates is one of them! 🙂
Hi Greg,
I’ve seen 2 version of your app which is free and buy version. But when I search the app using my galaxy tab 3, there is only slrbooth pro…and it is free. So, how can I get the full version of the app…
One more thing, is there any chance I could use remote on this app? Means extra trigger for start shooting picture.
SLR Booth Pro has replaced the free/paid versions. All features are free for the time being 🙂
And yes, you can use a bluetooth remote trigger with the app.
Hi! Thanks for the answer above! I wanted to know too if there’s a chance that after taking a pic the LiveView-Screen shows up without pressing the “done”-button?
Turn on the auto-approve feature in the settings
Hi Greg,
I was wondering, if no internet is available, is there a way to keep the mail in some queue for upload at home ?
That would be perfect !
What are the mininum spec for an android tablet to run slr booth ?
Queuing is a good idea – but not in the app at the moment. You need an Android device running 4.1 or higher with USB Host support.
Reposting my question:
Hi!
Just bought the App some days ago and it works great for me (Samsung Galaxy Note 10.1 2014 & Canon EOS 550D)! Now I wonder if there’s a chance that after taking a pic the LiveView-Screen shows up without pressing the “done”-button? I’ve tried the “Restart LiveView automatically”-Option in the Photo Shoot Settings but it didn’t work. Right now I trigger via display button, but in the future I’d like to use an external trigger (maybe there’s an other functionality when you use display or an ext. trigger?). Plus: Can I completely remove the Facebook-, Twitter- and QR-Button at the View mode (I’ve deactivated all of them in the settings but those three are still displayed)? If no, could you please adapt the app? 🙂
Greetings from Austria and thanks for your answer! 😉
The sharing options should go away if you have the restart live view automatically enabled. Make sure you set a restart delay as well.
No answer??????
What was your question Juergen?
Hi,
thanks for the last update! Nice look but I can`t read the underline text in option mode. Grey isn´t the best color for it.
Next problem is the kiosk mode. I found a bug. If u click the gallery button and back button more than 5 times again, it will kick u out of kiosk mode without using pw. Please check it.
Best regards
Marco
Thanks for the feedback Marco!
Hi greg how do I get two touch screen to work with the kiosk function
Hi Ramon – can you elaborate a bit?
Hello Greg,
Excellent job on the app.One of a kind for sure. Quick question.I see an SMS option but even when checked that doesn’t show up in kiosk or gallery mode. Can you please help.also the screen saver doesn’t work as described. I am running full version SLR booth on Nexus 7 2013 with Canon 6d.thank you.
The SMS option is only available on a device capable of sending texts (ie, a phone, or possibly a tablet with a mobile data plan) – what issue are you having with the screensaver?
Hi there,
I am planning to set up my own photo booth for my upcoming wedding. This looks like it’ll be the best app available because of the customised sharing and kiosk mode options. I do have a few questions with camera setup:
– will any camera work? Like a point and shoot Canon power shot for example?
– I’m worried that the camera will time out and turn off… Any suggestions to avoid this?
– why isn’t there an option for using the tablets front camera (Acer Iconia 10)? I know the intention is to use an SLR for better quality but why can’t there be an option for the tablets camera if desired? I then wouldn’t have the risk of the camera turning off.
I think if I can figure this out it’ll be the best photo booth app for android for sure. Please let me know your thoughts… Thank you!
Hi Scott – it only supports Canon and Nikon DSLR cameras – powershots use a different protocol, and aren’t compatible.
Thanks for the quick reply.
Curious if its an easy add to let it use the front camera on the tablet?
I have an Acer Iconia
The focus of the app is providing the highest-quality experience. Front facing cameras are pretty dismal compared to an SLR – especially in low light where most events take place.
Hi Greg,
App looks awesome, i’m looking at running it on a Minix Neo X7 and a Canon 550d with USB foot switch / USB push button for events.
Just a quick question in regards to printing. Is it possible in settings to have a limit of number of prints guests can type in? Just a concern that guests with a few drinks on them will try print x50 copies for a joke!!!
If printer is shared via laptop, could I set to auto-print an exact number of copies? For example, x4 copies each time? Or could I technically view the print jobs completed list, and re-print extra copies from there, with auto-print set to x1 copy each time?
Thanks,
Rob
Hi Rob, there currently isn’t any limit on the number of prints, but that seems like a good idea: we’ll look at adding that and the number of copies for auto-printing in an upcoming release.
Hey Greg ! Thank you again for the app. I have the full version, tested last night and it was a party killer !! Also i have few suggestions: The start button should have option to be on some color red maybe, now is barely hard to see with the picture on background ( tablet 10″ in my case) and a test button (not to use a 1 pic template) for testing with the light, or some camera testing etc.
Please keep working on this app in the future, it’s fantastic and create a thanks or donate button for helping you with that 🙂 !
Thank you for the kind words 🙂 I’ll see if we can make the start button stand out more.
Hey Greg,I just started to check out the full version of your app and it looks very nice.
I have one question about triggering the camera. I built a remote buzzer trigger for my camera and I wish I could use this in combination with your app. Is there any possibility to start the countdown to take a picture via the camera instead of using the screen or a keyboard? That would be awesome! Oh,and aback button on the screen to leave the gallery would be nice,too.
Thank you very much,Alex
Hi Alex – the app can’t be triggered by the camera, although you can use a bluetooth remote to trigger the app. A few folks are asking for a back button on the gallery screen, so we’ll look into that.
Hey Alwy,
I use a small USB keyboard in connection with a 7 port HUB on my Tablet . The USB keyboard there for 10 € at Amazon . I bought a big red button . Then soldered the spacebar the small keyboard to this and ready. Now everyone can as hard as he likes to beat the buzzer and there is only one image process started
Hi Again Greg, last question, can we use the camera canon ixus 275 hs, it dose show a live view with its own app, but would it work with your app? we can do wired or wifi its no bother to us.
The point & shoot cameras use a different protocol, and aren’t compatible with the app.
Hi, I would like to know if this can be set up to Auto Print and remove all share options.
The aim it to have it running, user tap screen, pictures (set of 4) taken then auto printed, also to save the pictures into a file that my laptop can access to produce a live picture feed for large screen viewing.
Thank you,
Antony M.
Yes, you can remove the sharing options, and yes you can auto print. The pictures can’t be saved to a laptop, but there is a slideshow feature built in – if you navigate to http://:8080/ with your laptop, you should get a slideshow (assuming they’re on the same wifi network)
Hello I’m very interested in your app. I’m looking to buy a surface pro 3. Just wanted to know if the app will work on this device?
Thank you.
Only for Android at the moment!
Still can’t print from the app. The camera and app work great and populates the traditional photobooth template on the paid version. When I click on print it just says “sending to printer”.
Camera: Nikon D5100
Tablet: RCA Viking Pro (model# RCT6303W87DK running Android 5.0)
App: SLRBooth – paid version
Printer: Epson XP-320
What do you suggest?
The next version of the app will have Google Cloud Print support – your printer seems to support that, so try it out when it’s available.
The App is great! The only thing that I don’t get it when I use the dslr connect cable to Tab 4 (android), when I was testing taking photo that the memory card doesn’t save from dslr and only Tab 4 (android) save the photos.
Please help. I really wanna use this app
Thank you.
Hi Alex – the free version doesn’t allow the original files to be saved, only the downsized watermarked versions. If you’re using the full version, there’s an option to remove JPEG files from the camera – make sure this is turned off if you want to keep them there.
Hi,
I’m testing the free version of the app before i buy it.
I can’t seem to get the app to work. The error I am facing is “Unable to connect to the camera! No compatible camera found. Please connect your camera via USB”
I am using a Canon EOS 60D for my camera and a Samsung Galaxy Tab S2 (8.0, 4G+). I also tried on a phone device and have the same issue.
Please help. I really wanna use this app.
Thank you.
The 60D is definitely compatible – make sure you grant permission for the app to use the camera when you plug it in, and don’t let the gallery or any other app have control of it.