

1. To get started, purchase and install the SLR Booth app from the Google Play Store on your Android device.
2. Plug your usb cable into your camera and Android device. Finally, turn the camera on – the app will launch and you’ll be ready to start taking pictures right away! You can also launch SLR Booth by clicking on the app icon.
Getting Started: The Main Screen
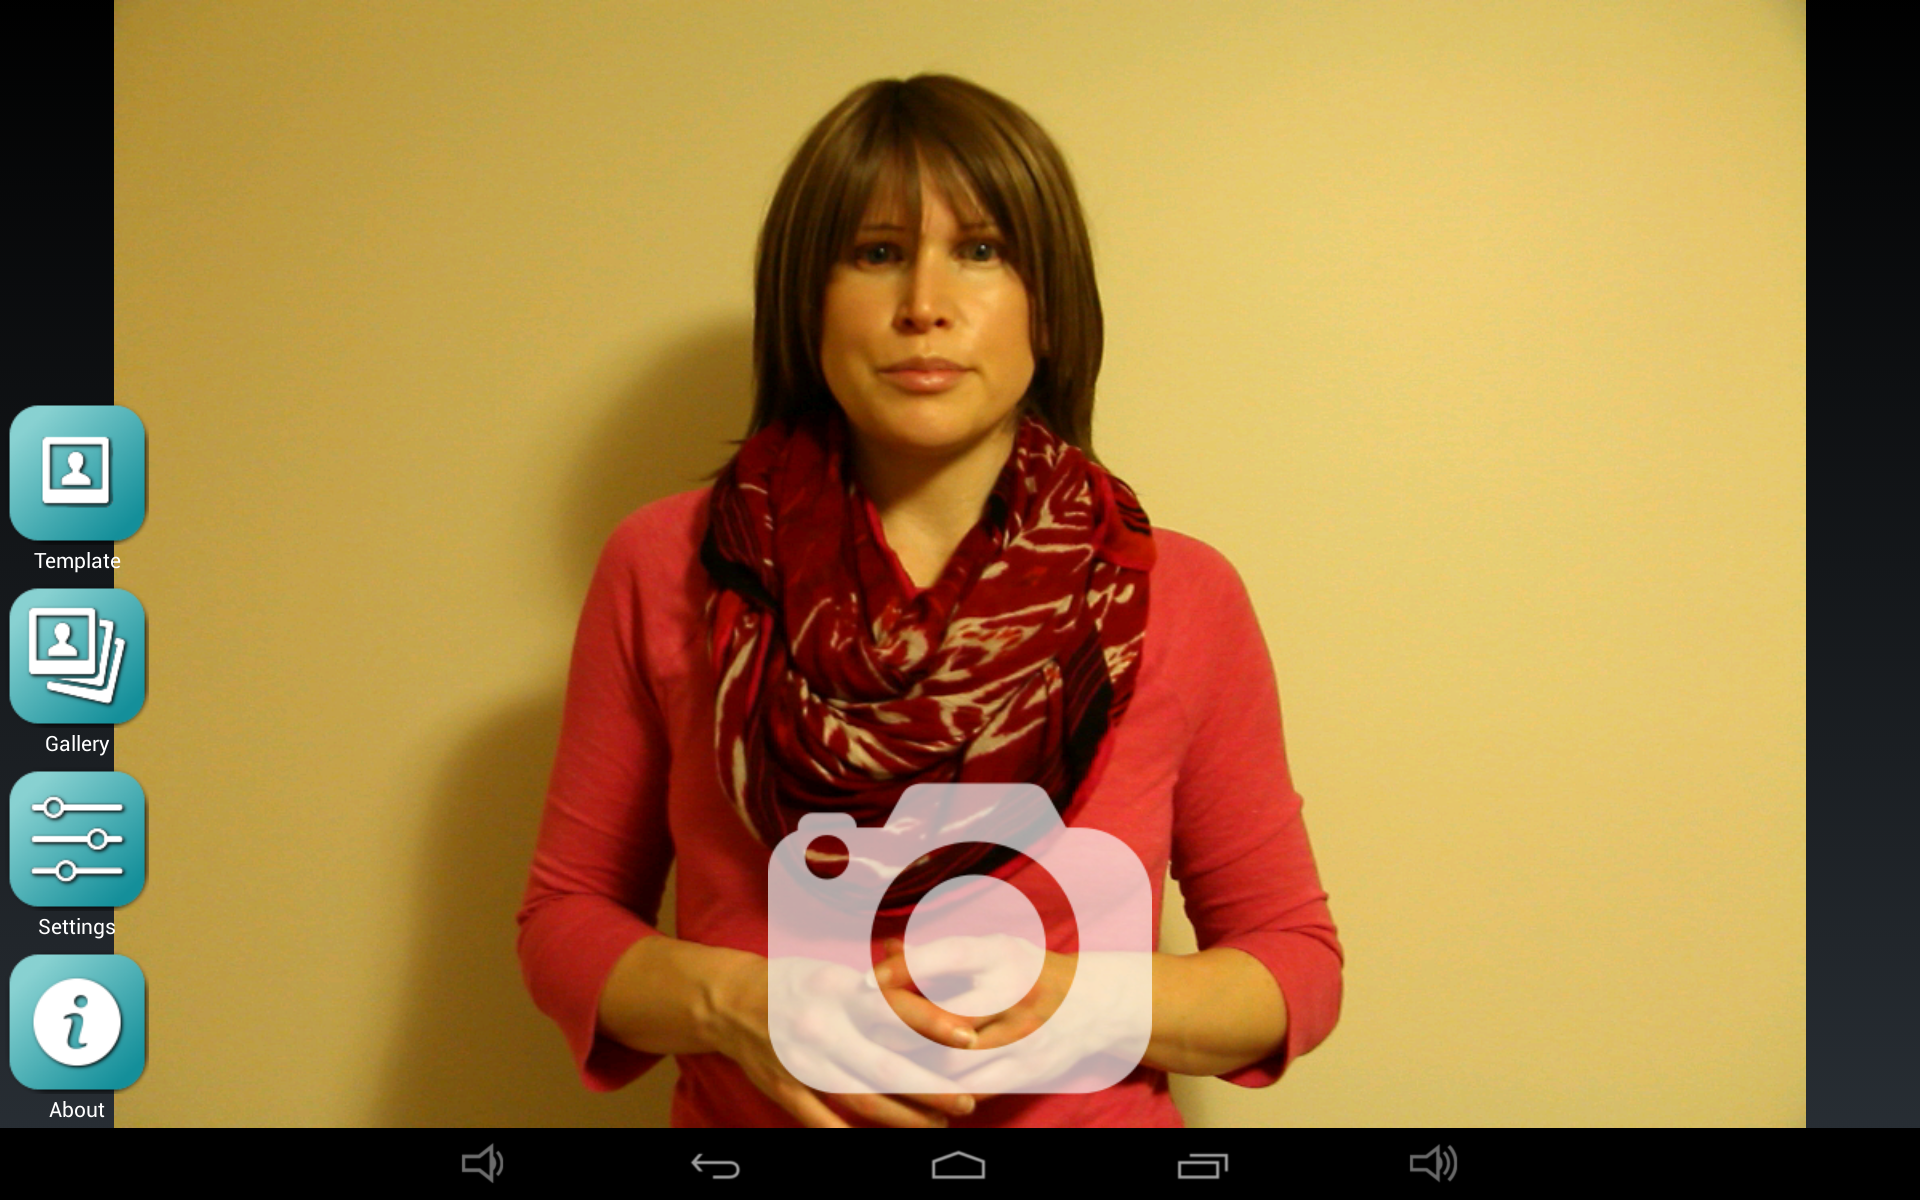
When you first launch the app and connect your camera, you’ll be presented with the main screen, and the app will search for your connected DSLR camera. When it finds the camera, it will start a live preview on the screen. Once the preview is running, you can take a photo one of the three following ways:
- Touching the camera icon in the centre of the screen
- Pressing the space bar key on an attached keyboard (or USB pedal configured as a space bar)
- Pressing the “volume up” button on your device (or using a Bluetooth remote shutter, which sends the “volume up” signal)
Once engaged, the app will begin a countdown to take the photos required for your current layout. If the countdown was launched with a touch, after each photo the subject will have the opportunity to accept or delete it. Once all the photos for your layout have been taken, you’ll have the ability to print, email, and upload to Instagram or Twitter.
Pressing the camera icon at the bottom of the screen will initiate a capture and begin the countdown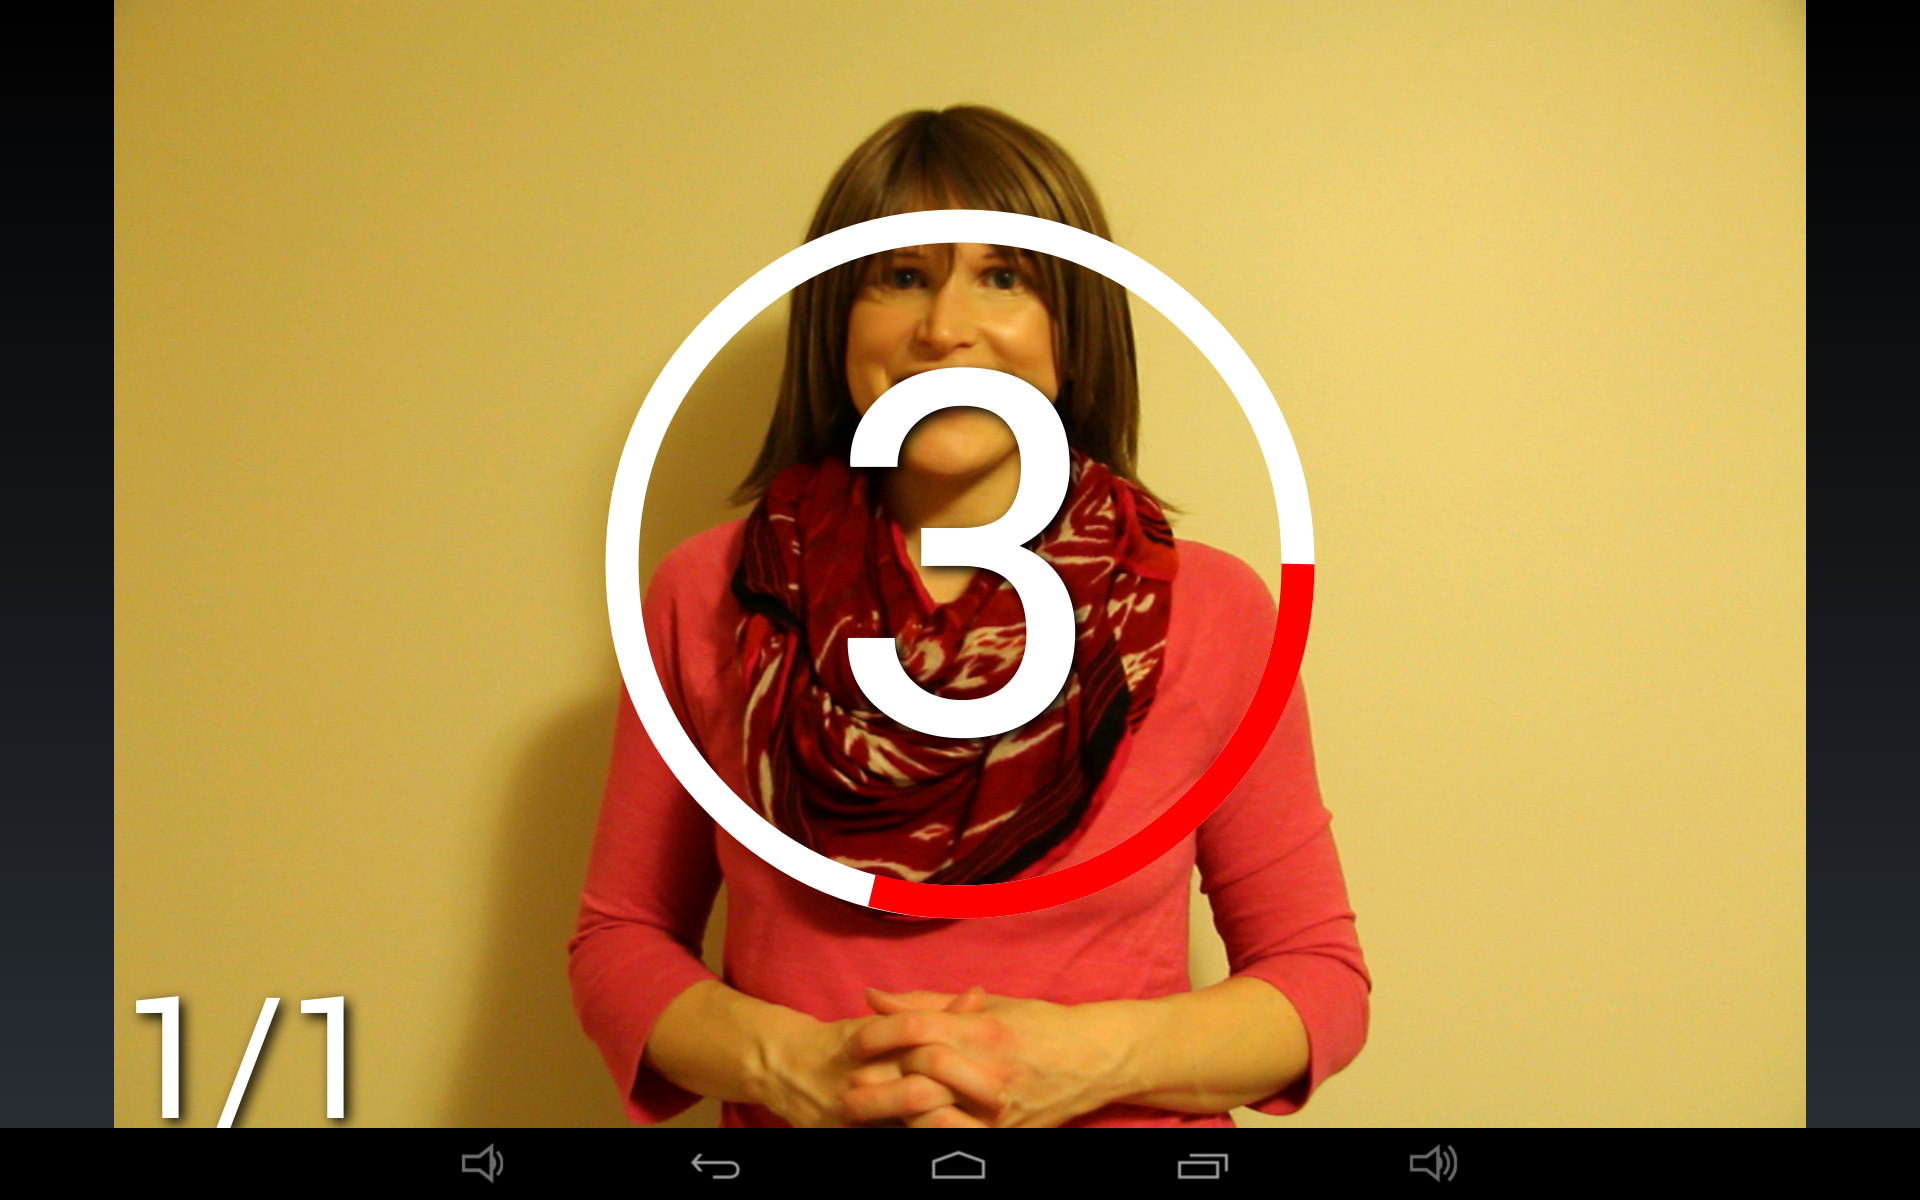
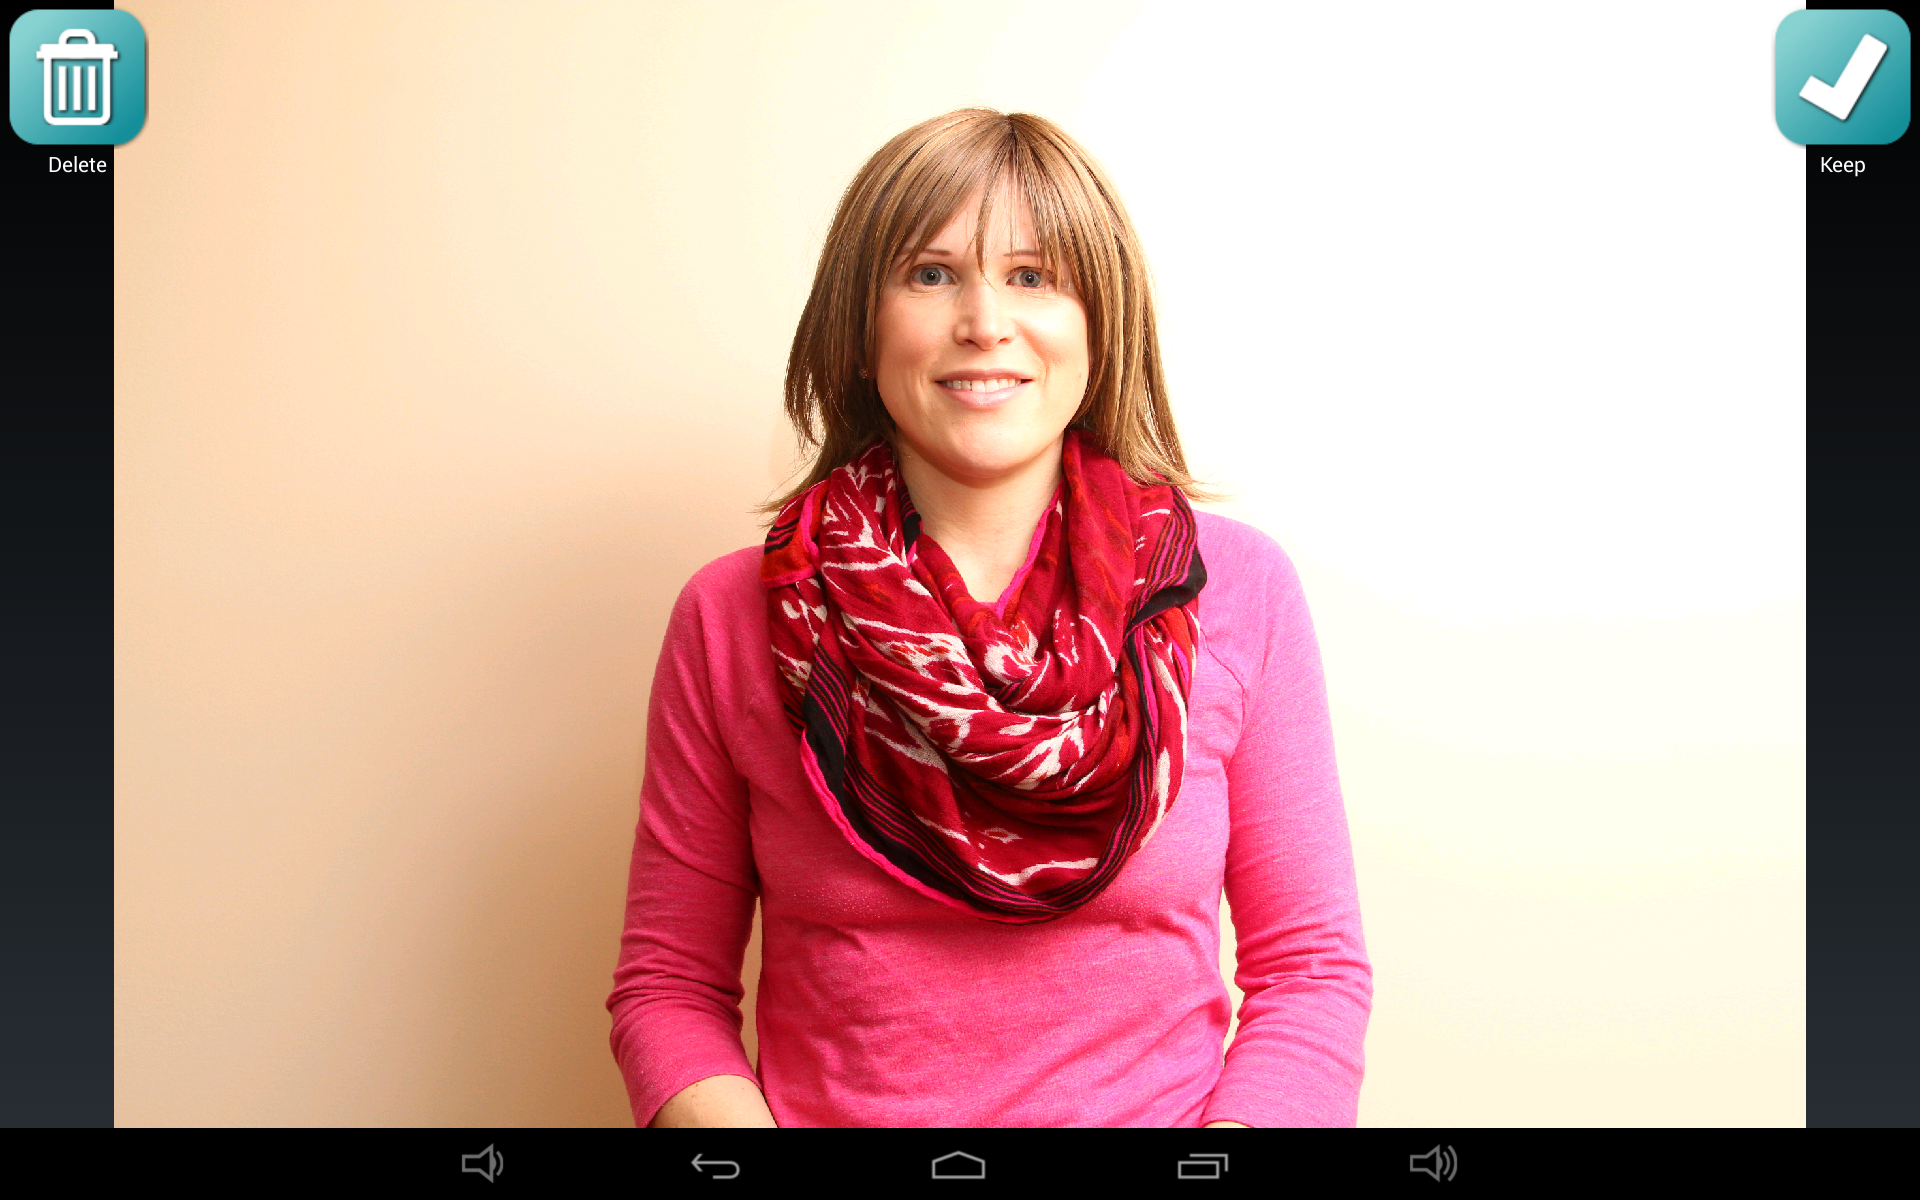
Once the photo has been taken, it will be downloaded and displayed on screen for review. You can choose to either keep or delete each photo.
If you keep the photo, you’ll have the option to print, email or share the photo via Twitter and Instagram. You can set up custom hashtags for each event which will post along with the photo, making it easy for guests and customers to view event photos on their own devices in real time. 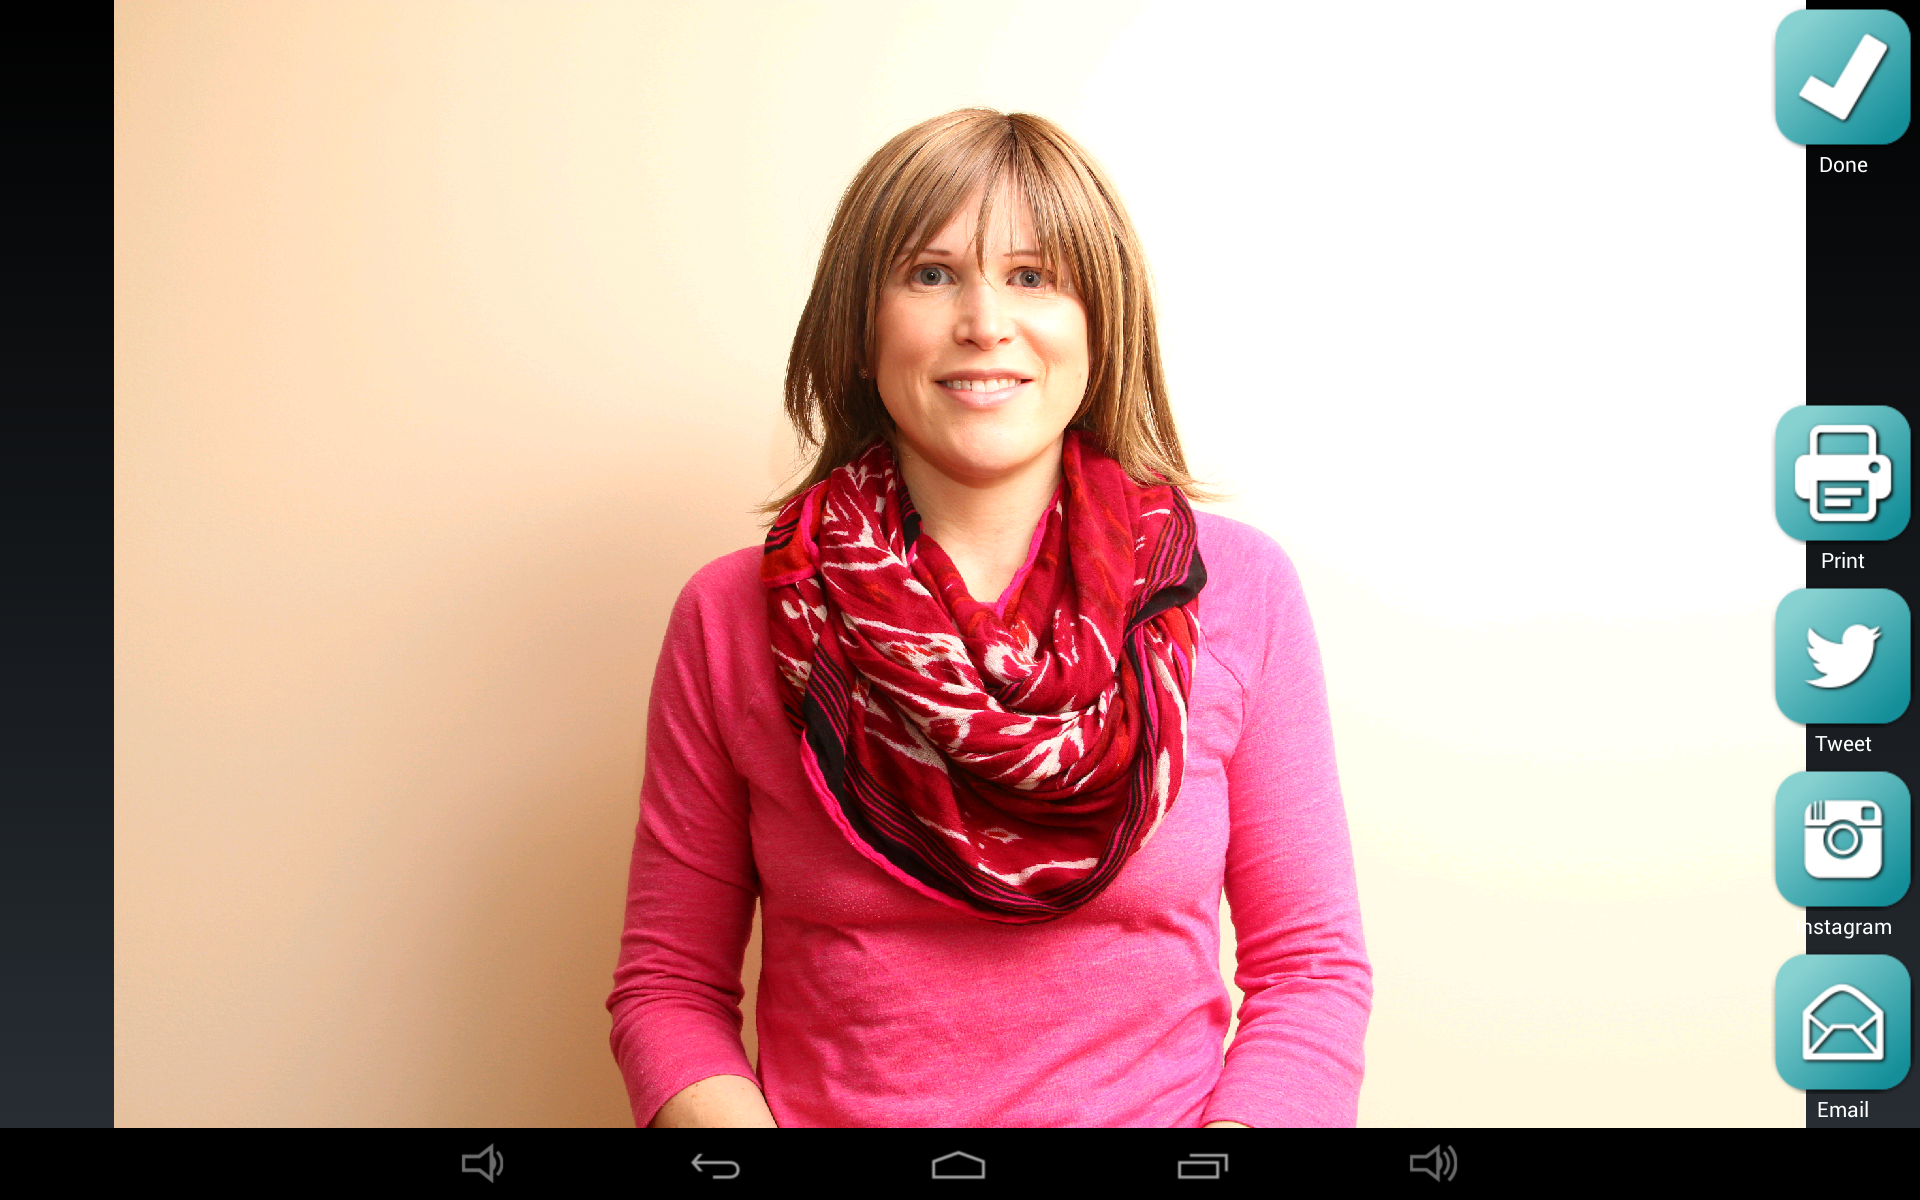
The first time you press the Twitter button, you’ll be asked to log in. Once you sign in and give SLR Booth access to post on your behalf, you won’t need to sign in again. If you need to logout and sign in as someone else, hold down the twitter button for two seconds.
Settings
The settings screen contains all the preferences that control your photo booth experience. It is broken up into three sections:
Photo Shoot Settings
These settings control how your photo booth behaves when taking pictures:
- Layout Footer Image: Lets you select a custom footer image to be used when using a template with a logo placeholder
- Album Name: Organizes your photos into a named album, allowing you to keep photos from different events separate
- Countdown Delay: How many seconds will the countdown timer run for before triggering the camera
- Shutter Delay: Delay (in milliseconds) between pressing the shutter, and the camera taking a picture. This needs to be set by trial and error so that the camera actually triggers right when the countdown expires. On a Canon 60D in “quick” live view auto focus mode, this is about 1200ms. Switching the camera to manual focus reduces the delay to about 50ms.
- Print Automatically: Controls if photos are printed automatically. This is intended for use with a foot-pedal or remote control triggering mechanism – if guests are using the touchscreen display, they can choose to print the photo or not.
- Printer: Searches for nearby photo printers, and allows you to select one to print to.
Social Media Settings
These settings control the interaction between the photo booth and Twitter
- Upload to Twitter: Controls if photos are automatically posted to Twitter
- Twitter Hashtag: Adds a #hashtag to photo posts, allowing easy searching
Email Settings
These settings control the account used to send email
- Email Server Name: Name of the email server. ie, smtp.gmail.com
- Email Server Port: Port the mail server is listening on. 587 for gmail
- Email Username: Account name. ie, myname@gmail.com
- Email Password: Password for the above username
- Use SSL: Enable for email providers that require SSL
- Use TLS: Enable for email providers that require TLS (Turn on for gmail)
- From email address: Email address the email will be sent from. Usually the same as the Email Username setting.
- Subject Line: Subject Line of the email which will be sent
Gallery
On the gallery screen, you can view the photos that have been taken with SLR Booth. The gallery will only display images in the current album. Initially, you’ll be shown thumbnails of all the photos in your album. You can scroll quickly through these thumbnails by dragging up or down. If you choose a photo by touching it, you’ll switch to the fullscreen view where you can delete, print, email, tweet or instagram a photo. You can also scroll between images in this view by swiping left or right.
About
The about screen displays information about the developer and libraries used in the application.
SLR Booth
Copyright (C) 2014 Greg Perkins
This product uses the following libraries licensed under the Apache License, Version 2.0.
JmDNS – Copyright (C) Rick Blair
ACRA – Copyright (C) Kevin Gaudin
Android Platform Base – Copyright (C) The Android Open Source Project
RWC – Copyright (C) Nils Assbeck, Guersel Ayaz and Michael Zoech
Twitter4j – Copyright (C) Yusuke Yamamoto
Facebook4j – Copyright (C) Ryuji Yamashita
Harmony – Copyright (C) The Apache Software Foundation
Details of the Apache License, Version 2.0 can be found at http://www.apache.org/licenses/
Hi we downloaded this app to use for an event on Sunday but we cannot get it to upload the pictures to Facebook or email them. Any suggestions?
Feel free to email info@slrbooth.com and we’ll try to sort it out.
I just bought the $10 app and when i connect my canon t5 dlsr to my acer a700 android 4.1 tablet I took one session. then I keep on getting this small error window that says
unfortunately slrbooth has stopped with options for report or ok
I hit ok and another Print windows says the format isn’t supported I click ok and this message comes up every minute or so, how do I get rid of it?
Hi Rolland – if you can submit the crash report that will help me identify/resolve whatever the issue is.
I’m also curious as to when an app update will be released. I’m very very interested in buying the full version. But if I can’t use it, there is no point.
The free version was a bit out of date – published an update today to bring it up to date with the full version
“Layout Footer Image: Lets you select a custom footer image to be used when using a template with a logo placeholder”
Please elaborate on this. I have no problem creating a .PNG template file, with various number of 2×3 aspect ratio openings that populate when in use, and have been adding custom event specific content on a new template for each event.
How can I specify a “logo placeholder” on a template file, and, what are the dimensions or restrictions?
The logo placeholder is only for the built-in filmstrip template. If you’re using a custom template, just apply the logo before you load it into the app
How do you connect to a printer? My tablet already connected to a prrnter but when i tried to search in the setting menu, there’s none.
Is your printer a wireless AirPrint model?
Yes. Mine is HP Envy 4500.
Ive purchased the app, and I’m trying to go into settings, and every time I click settings, its crashes and I’m kicked out. please help.
Are you by chance using a Samsung device running Android 5.1? There appears to be an issue with requesting permission for USB devices on that Combo – I’ll try and put a workaround in – look for a fix in the next version.
I too have this issue. I’m running an Android Galaxy Tab E
If possible, please submit the crash report – this really helps identify the issue!
Do you have any plans on adding animated gifs? I’m looking for an affordable software that incorporates animated gifs.
The app doesn’t do animated gifs at present – how would you see that working?
Hallo
Kann ich die per Mail mal meine Verbesserungen schicken, die ich mir wünschen würde. Ob ihr die dann einbaut oder nicht liegt dann bei euch.
Viele Grüße
Florian
Hallo Florian,
Ich würde gerne über Ihre Verbesserungsvorschläge zu hören. Bitte E-Mail info@slrbooth.com mit Ihren Ideen.
The first couple of times I used this app everything was great. Now when I take a photo it says it isn’t able to capture the image. Any suggestions?
Hi Tara, a couple of simple things to check: Memory card is full, Battery almost dead, unable to autofocus (try manual focus), shooting only RAW but have skip RAW files enabled
Thank you!
It’s working a little better but only capturing every other image. The first image it says what is said previously. Not able to capture image. It remakes it and works! The second image it doesn’t work but remakes it and works. It goes on like this. It is like this no matter which template I use.
Thank you for your help in advance.
Are you shooting RAW by chance? If you’re shooting full size RAW, and have a slower memory card it might be taking too long to download. Try shooting a small or medium JPEG and see if that improves things.
i have:
* Acer DA220HQL 21.5
* canon camera t3
* flash speedlite
* canon selphy CP900
It can be operated?
What I need?
As long as your Acer DA220HQL is running Android 4.1 or higher
Hi, thanks for update the software. I see you added a slideshow support. But in the settings I can`t find something about!
Have you the chance to make a button in the gallery mode to get back to lifeview? 🙂
Thanks a lot
Seb
Hi Seb,
The slideshow is very basic at the moment and is meant for viewing on a second screen. In a browser go to http://:8080/ and it will start a slideshow of all the photos in the current event’s folder.
This is going to be refined over the next little while, and I’ll add some more instructions on the website once it is a bit more mature.
If I’m I understanding this correctly…
The Android device “running” SLR Booth and controlling the camera and managing the image taking and the template population will add WiFi support of webserver/web requests from close proximity devices and provide a slideshow/gallery on that 2nd device? *SWEET*.
Please advise how to update my current PAID version of SLR Booth, and feel free to email if you’d like a tester.
Nate
(40+ years in the Info Systems field, including application testing and constructive feedback to developers)
The app should update auto-magically 🙂 If you know your device’s IP address, hit http://(ip address):8080/ in a browser and the slideshow should come up.
Hi,
great Software! Is it possible to make a automatic diashow if nobody make a picture?
If I using LiveView for 6 Hours work, it isn´t so good for my cam.
Does it get a button to get back from the galary mode to the LifeView mode?
Because nobody should use the button back on my tablet 🙂
Best regards
Seb
There will be a slideshow feature coming soon :). As for navigating back from the gallery, yes that requires using the back button.
I just downloaded the app yesterday, and there’s no way for me to set up instagram as an option for sharing. Ideas?
Hi Shelly, for Instagram sharing, you’ll need to have the Instagram app installed – it works by sending the photo to that app to be processed. I wish instagram had a better API for sharing, but that’s all we can do for now.
Will this work with a HITi sub dye printer?
It will if you can share it over the network. I’ve use a HiTi P510L shared via a Mac laptop at many events.
Hi! I just purchased the app a few days ago and I’m running a few trials. I’m using a galaxy tab pro 8.4 and a nikon d5300, and I’ve noticed theres some lag. My camera is only taking .jpg file photos to speed it up a little, but are there certain specs that would be preferred for smoother functioning? I was also wondering if the cable had to do with download/transfer speed?
If your cable has a loose connection, it can definitely cause issues. As for settings to speed things up, make sure you’re taking JPEGs and using the smallest picture size that you need on the camera (might not need 24MP for a 4MP screen), and in the app there’s a “high quality” mode you can switch off to speed up processing times as well.
Hi. I bought a Bluetooth printer but I don’t see it in choose printers… Does it only work via WiFi? Can’t use USB cord because its used for the camera.
BTW printer is hp officejet 100 mobile
*Ping* =)
Hi Jamie – bluetooth printing isn’t supported, only AirPrint
Great App! One question though. In kiosk mode is there any way to only allow 1 copy of a photo to be printed. Each time the user goes to print it comes up with a dialog to ask for how many. Would like an option to override or bypass this if possible. Thanks…
Hi John,
Right now the closest you could get would be to turn on automatic prints, and disable the print button in kiosk mode – that way each guest would get exactly 1 photo. We’ll add an option to disable the # of prints dialog in a future release. Thanks for the feedback!
Hi! I’m having struggles getting the app to recognize my printer. The printer is an Epson Workforce 845 and my device has the Epson Printer client enabled but the app still won’t recognize it.
Hi Axel, looks like that printer supports AirPrint, so it should be supported by SLR Booth. Make sure they’re on the same wireless network – you shouldn’t need to use any special printing app.
Hello, I purchased the app two days ago. I am wondering how I can create the layout for the photos? When I access this in the app it takes me to all of the files on my tablet. Do I need to create a layout with text on it ie “Happy Birthday Shannon” and then use that as the layout for 4 pics on a 4 x 6? I also had issues where after snapping one pic, the app would stop and close. I chose to send the error report however I do not know what that does. I am trying to set this up for my event on Saturday.
Hi Shannon – there’s a new page up describing how to create and load a custom template – check out: http://www.slrbooth.com/custom-photo-booth-templates/
If you’re having issues, feel free to email info@slrbooth.com and we’ll help you sort them out.
Hi there!
I was testing out your app today, but I had a few questions.
I would like to buy the full version but need to know if I will have control over the following…
1. I don’t want people to have access to delete photos.
2. I don’t want people to email photos.
3. No prints
I want to make sure I can have a very simple set up. I prefer to edit photos myself after an event, but need a simple booth set up.
Thanks,
Amanda
The full version has the ability to enable a kiosk mode where you can control how users can share photos, and you can set it to automatically keep all the photos (ie, don’t give users the ability to delete). You also don’t have to setup a printer – it can certainly be used as digital-only.